这个,实际上很简单。本来是要介绍openwrt文件系统挂载的,不过想想,这个也是属于文件系统挂载的一部分。…这里就简单介绍挂载,我还是给不会的童鞋教一遍吧,如果还是不会,自己摸索吧。
首选磁盘格式:ext3/ext4。
这里我们先添加一块大小为160G的空硬盘,将其分区并格式化。
1.查看硬盘
使用ssh登陆openwrt。在这边,我们可以用 fdisk -l 命令来查看系统是否检测到了你的磁盘。
root@Navigator:~# fdisk -l
Disk /dev/sda: 403 MB, 403177472 bytes
255 heads, 63 sectors/track, 49 cylinders, total 787456 sectors
Units = sectors of 1 * 512 = 512 bytes
Sector size (logical/physical): 512 bytes / 512 bytes
I/O size (minimum/optimal): 512 bytes / 512 bytes
Disk identifier: 0x00000000Device Boot Start End Blocks Id System
/dev/sda1 * 512 131583 65536 83 Linux
/dev/sda2 132096 787455 327680 83 LinuxDisk /dev/sdb: 171.8 GB, 171798691840 bytes
255 heads, 63 sectors/track, 20886 cylinders, total 335544320 sectors
Units = sectors of 1 * 512 = 512 bytes
Sector size (logical/physical): 512 bytes / 512 bytes
I/O size (minimum/optimal): 512 bytes / 512 bytes
从这里可以看到,刚才添加的那块160G磁盘位于/dev/sdb,这里列出了硬盘的容量,扇区,柱面等信息。
2.分区操作
关于分区,可以使用 fdisk /dev/sdb 命令进行分区操作。这边sdb对应的是刚添加的那块磁盘。输入 fdisk /dev/sdb 回车,会出现如下信息:
root@Navigator:~# fdisk /dev/sdb
Welcome to fdisk (util-linux 2.21.2).Changes will remain in memory only, until you decide to write them.
Be careful before using the write command.Device does not contain a recognized partition table
Building a new DOS disklabel with disk identifier 0xcf1bdfe3.Command (m for help):
这时候已经进入了fdisk工具的命令界面,这里提示你输入命令进行操作。如果需要查看帮助直接输入 m 。
Command (m for help): m
Command action
a toggle a bootable flag
b edit bsd disklabel
c toggle the dos compatibility flag
d delete a partition
l list known partition types
m print this menu
n add a new partition
o create a new empty DOS partition table
p print the partition table
q quit without saving changes
s create a new empty Sun disklabel
t change a partition’s system id
u change display/entry units
v verify the partition table
w write table to disk and exit
x extra functionality (experts only)
①创建主分区
p:查看当前分区;n:创建新的分区;w:将修改后的分区表写入磁盘
因为是空硬盘,所以输入p也看不到任何分区。此时输入 n ;
Partition type:
p primary (0 primary, 0 extended, 4 free)
e extended
Select (default p):
如果选择p,则会创建主分区。由于fdisk只支持MBR分区类型,所以它最多只可以拥有4个主分区。默认为p,回车。
Partition number (1-4, default 1):
这时候会提示我们创建的主分区分区号,默认为1,可以直接回车。这时候会提示我们选择创建的主分区的默认柱面,保持默认,回车。
First sector (2048-335544319, default 2048):
当然,一般人不可能去计算柱面对应的分区大小,回车后会出现以下内容。输入 + ,后面携带你想创建的主分区的分区大小。单位可以是K,也可以是M,或者是G,后缀为大写。这里我创建主分区为60G,则输入+60G
Last sector, +sectors or +size{K,M,G} (2048-335544319, default 335544319): +60G
回车后会返回 Partition 1 of type Linux and of size 60 GiB is set,提示分区1已经创立,大小为60G。接着会回到 Command (m for help): 。可以输入p来查看已分区的分区。
Command (m for help): p
Disk /dev/sdb: 171.8 GB, 171798691840 bytes
255 heads, 63 sectors/track, 20886 cylinders, total 335544320 sectors
Units = sectors of 1 * 512 = 512 bytes
Sector size (logical/physical): 512 bytes / 512 bytes
I/O size (minimum/optimal): 512 bytes / 512 bytes
Disk identifier: 0xcf1bdfe3Device Boot Start End Blocks Id System
/dev/sdb1 2048 125831167 62914560 83 Linux
②创建扩展分区
现在创建扩展分区,同样 输入n 。这时候我们选择e,创建扩展分区。这时候的默认分区号为2。这里我们一路直接回车。因为我将剩下的全部容量都作为扩展分区的一部分,创建完扩展分区后将会把这部分扩展分区的容量划分成若干个逻辑分区。
Command (m for help): n
Partition type:
p primary (1 primary, 0 extended, 3 free)
e extended
Select (default p): e
Partition number (1-4, default 2):
Using default value 2
First sector (125831168-335544319, default 125831168):
Using default value 125831168
Last sector, +sectors or +size{K,M,G} (125831168-335544319, default 335544319):
Using default value 335544319
Partition 2 of type Extended and of size 100 GiB is set
这时候我们可以看到剩余的100G已经全部属于扩展分区了。
③创建逻辑分区
同样输入命令 n ,我们选择 l ,进行逻辑分区的创建操作。同样使用回车键跳过柱面,输入容量。比如当前要创建的分区为70G。输入 +70G ,回车后提示已经完成容量为70G的分区的创建操作了。
Command (m for help): n
Partition type:
p primary (1 primary, 1 extended, 2 free)
l logical (numbered from 5)
Select (default p): l
Adding logical partition 5
First sector (125833216-335544319, default 125833216):
Using default value 125833216
Last sector, +sectors or +size{K,M,G} (125833216-335544319, default 335544319): +70G
Partition 5 of type Linux and of size 70 GiB is set
现在我们创建最后一个分区,依旧为逻辑分区,使用剩下的全部容量。如果你只要创建一个或者两个分区,跳过上面输入容量的步骤,直接回车即可。
Command (m for help): n
Partition type:
p primary (1 primary, 1 extended, 2 free)
l logical (numbered from 5)
Select (default p): l
Adding logical partition 6
First sector (272635904-335544319, default 272635904):
Using default value 272635904
Last sector, +sectors or +size{K,M,G} (272635904-335544319, default 335544319):
Using default value 335544319
Partition 6 of type Linux and of size 30 GiB is set
此时,分区创建已经完成,可以输入p查看已经创建的分区,如果不需要修改,则输入 w 进行保存操作即可。
我们看到已经创建的分区:
Command (m for help): p
Disk /dev/sdb: 171.8 GB, 171798691840 bytes
255 heads, 63 sectors/track, 20886 cylinders, total 335544320 sectors
Units = sectors of 1 * 512 = 512 bytes
Sector size (logical/physical): 512 bytes / 512 bytes
I/O size (minimum/optimal): 512 bytes / 512 bytes
Disk identifier: 0x7dfec402Device Boot Start End Blocks Id System
/dev/sdb1 2048 125831167 62914560 83 Linux
/dev/sdb2 125831168 335544319 104856576 5 Extended
/dev/sdb5 125833216 272633855 73400320 83 Linux
/dev/sdb6 272635904 335544319 31454208 83 Linux
输入w进行保存和退出操作。
Command (m for help): w
The partition table has been altered!Calling ioctl() to re-read partition table.
Syncing disks.
这时候可以通过 fdisk -l 或者 ls /dev/sdb* 来查看sdb磁盘下已经创建的分区。
root@Navigator:~# ls /dev/sdb*
/dev/sdb /dev/sdb1 /dev/sdb2 /dev/sdb5 /dev/sdb6
3.格式化磁盘分区
虽然我们已经完成分区的划分,但是此时分区是没有文件系统的,所以我们并不能对分区进行文件的读写操作等。在linux系统下,推荐使用ext3/ext4作为磁盘的默认文件系统,对于部分支持ntfs的linux系统来说我也并不建议使用ntfs,由于ntfs的版权属于微软,它并不是开源社区的产品,虽然有ntfs-3g这个开源项目为linux提供支持,但效率不高。
这里,我们可以使用 mke2fs 命令来创建磁盘的文件系统。
输入mke2fs,我们可以发现他包含以下参数,常见的有-b 块大小,-C 簇大小,-J 建立日志系统 -U 创建UUID 和 -t 要创建的文件系统。
root@Navigator:~# mke2fs
Usage: mke2fs [-c|-l filename] [-b block-size] [-C cluster-size]
[-i bytes-per-inode] [-I inode-size] [-J journal-options]
[-G flex-group-size] [-N number-of-inodes]
[-m reserved-blocks-percentage] [-o creator-os]
[-g blocks-per-group] [-L volume-label] [-M last-mounted-directory]
[-O feature[,…]] [-r fs-revision] [-E extended-option[,…]]
[-t fs-type] [-T usage-type ] [-U UUID] [-jnqvDFKSV] device [blocks-count]
比如,我们要将/dev/sdb6创建文件系统为ext4的分区,则可以使用mke2fs -t ext4 /dev/sdb6 。在这里,我们统一将文件系统创建为ext4。注意:这边/dev/sdb2为扩展分区,是不可以有文件系统。所以我们不需要对其格式化,当然格式化也是会提示出错的。
当提示以下信息时候,则表示文件系统已经创建完成。
Allocating group tables: done
Writing inode tables: done
Creating journal (32768 blocks): done
Writing superblocks and filesystem accounting information: done
4.文件分区的挂载
在linux下,如果我们要对分区进行读写操作,则需要挂载它,类似Windows下给分区添加盘符的操作。这里,我们要将/dev/sdb1和/dev/sdb5以及/dev/sdb6挂载到/mnt目录下。
默认挂载命令:mount /dev/sdb1 /mnt
挂载带参数的命令:mount -o async,atime /dev/sdb1 /mnt/xxx ,这里表示该分区将文件缓存后写入以及更新文件的最后访问时间。
可以附加的参数:
Usage:
mount [-lhV]
mount -a [options]
mount [options] <source> | <directory>
mount [options] <source> <directory>
mount <operation> <mountpoint> [<target>]Options:
-a, –all mount all filesystems mentioned in fstab
-c, –no-canonicalize don’t canonicalize paths
-f, –fake dry run; skip the mount(2) syscall
-F, –fork fork off for each device (use with -a)
-T, –fstab <path> alternative file to /etc/fstab
-h, –help display this help text and exit
-i, –internal-only don’t call the mount.<type> helpers
-l, –show-labels lists all mounts with LABELs
-n, –no-mtab don’t write to /etc/mtab
-o, –options <list> comma-separated list of mount options
-O, –test-opts <list> limit the set of filesystems (use with -a)
-p, –pass-fd <num> read the passphrase from file descriptor
-r, –read-only mount the filesystem read-only (same as -o ro)
-t, –types <list> limit the set of filesystem types
-v, –verbose say what is being done
-V, –version display version information and exit
-w, –read-write mount the filesystem read-write (default)-h, –help display this help and exit
-V, –version output version information and exitSource:
-L, –label <label> synonym for LABEL=<label>
-U, –uuid <uuid> synonym for UUID=<uuid>
LABEL=<label> specifies device by filesystem label
UUID=<uuid> specifies device by filesystem UUID
<device> specifies device by path
<directory> mountpoint for bind mounts (see –bind/rbind)
<file> regular file for loopdev setupOperations:
-B, –bind mount a subtree somewhere else (same as -o bind)
-M, –move move a subtree to some other place
-R, –rbind mount a subtree and all submounts somewhere else
–make-shared mark a subtree as shared
–make-slave mark a subtree as slave
–make-private mark a subtree as private
–make-unbindable mark a subtree as unbindable
–make-rshared recursively mark a whole subtree as shared
–make-rslave recursively mark a whole subtree as slave
–make-rprivate recursively mark a whole subtree as private
–make-runbindable recursively mark a whole subtree as unbindable
这边注意-o,可以挂载为ro(只读),rw(读写),sync(操作直接写入磁盘),async(缓存后写入磁盘),atime(更新文件访问时间),noatime(访问文件时不更新文件最后访问时间)等。
这边我们将/dev/sdb1挂载到/mnt/sdb1(更新最后访问时间),/dev/sdb5挂载到/mnt/sdb5(文件直接写入分区),/dev/sdb6挂载到/mnt/sdb6。
首先,要创建这三个文件夹,都位于/mnt下,创建sdb1,sdb5,以及sdb6。
使用命令mkdir -p /mnt/sdb1创建。
root@Navigator:/# mkdir -p /mnt/sdb1
root@Navigator:/# mkdir -p /mnt/sdb5
root@Navigator:/# mkdir -p /mnt/sdb6
这时候开始挂载。命令见上面。
root@Navigator:/# mount -o atime /dev/sdb1 /mnt/sdb1
root@Navigator:/# mount -o sync /dev/sdb5 /mnt/sdb5
root@Navigator:/# mount /dev/sdb6 /mnt/sdb6
可以使用 ls /mnt/sdb* 查看挂载点。
卸载文件系统可以使用umount,后面跟文件系统或者挂载点都行。比如跟文件系统 umount /dev/sdb5,跟挂载点 umount /mnt/sdb5。
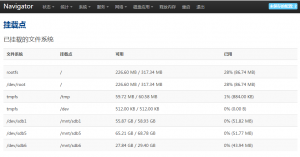
OPENWRT:手动挂载完成后可以刷新磁盘应用 – 挂载点,可以查看到已经挂载的分区。
谢谢了 ,正准备使用呢